Hey there, fellow DIY amigos! Are you tired of the same old routine? Day in and day out, it’s the same hustle and bustle, the same four walls closing in around you. But fear not, because tinktube is here to inject a little excitement into your life – and by excitement, we mean the thrill of building a DIY hammock stand, ensuring relaxation! Picture this: swaying gently in a freestanding hammock, the warm sun kissing your skin, a gentle breeze rustling the leaves overhead. Sounds like paradise, doesn’t it? Well, guess what? You can bring that paradise right to your backyard with our easy freestanding hammock stand plans.
But wait, you might be thinking, “I’m no Bob Vila – can I really pull this off?” Absolutely! With tinktube by your side, you’ll be a DIY pro in no time. We’re here to guide you through every step of the process, from gathering materials to putting the finishing touches on your masterpiece.
So, grab your tool belt and a cold drink, because we’re about to embark on the ultimate DIY outdoor adventure to make a hammock stand!
- Why build an outdoor hammock stand with tinktube?
- Materials and tools: learn how to build with tinktube
- The joy of building a DIY hammock stand from scratch
- DIY hammock stand plans: Step-by-step instructions
- Adding your personal touch
- Get started on your outdoor project today: Build this DIY hammock stand!
Why build an outdoor hammock stand with tinktube?
So, you might be wondering, why bother with a DIY hammock stand when you could just buy one from the store? Well, let me tell you – there’s something truly special about crafting your own piece of backyard paradise, especially when you build a hammock stand using simple tools and materials. Not only do you get to flex those DIY muscles, but you also end up with a one-of-a-kind creation that’s tailored to your space and style.
Why build a DIY hammock stand with tinktube instead of a wooden hammock stand? The answer is also easy: woodworking involves a lot of tools and accessories, like a circular saw or a miter saw, a drill, wood glue and more. Building with tinktube, all you’ll need are two tools, steel tubes and connectors.
Materials and tools: learn how to build with tinktube
Before we dive into the nitty-gritty, let’s make sure you’ve got everything you need. Grab your trusty tinktube steel pipes, connectors, a hammock (obviously), a measuring tape, and two basic tools: a pipe cutter and a T-handle wrench. Oh, and don’t forget your can-do attitude – that’s the most important tool of all!
Your list of materials
| Qty. | Part | SKU | Link |
|---|---|---|---|
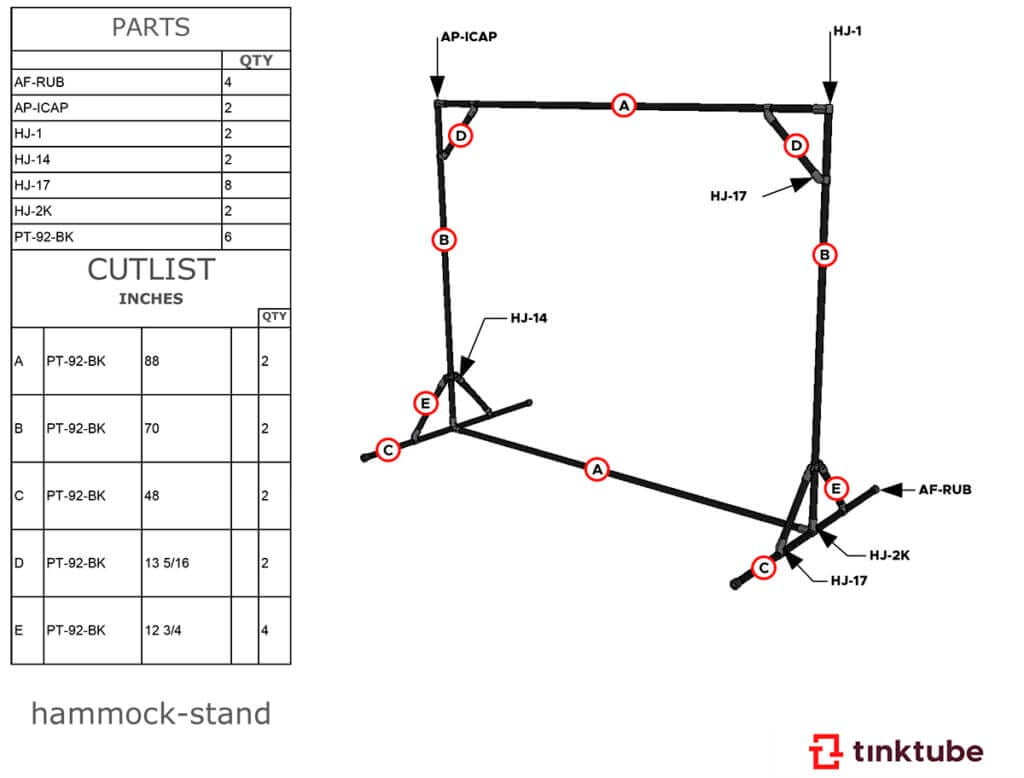
| 6 | 1-1/16" x 92" Jet black steel pipe | PT-92-BK | Buy now |
| 2 | Plastic Pipe End Cap | AP-ICAP | Buy now |
| 2 | 90 Degree Corner Pipe Connector | HJ-2K | Buy now |
| 4 | Rubber foot | AF-RUB | Buy now |
| 2 | Modular & Structural T Connector | HJ-1 | Buy now |
| 2 | Double angle pivoting black connector set | HJ-14 | Buy now |
| 8 | 45° Fix angle black connector set | HJ-17 | Buy now |
The tools you’ll need
| Tool name | Number | Add To Cart |
|---|---|---|
| T handle wrench | T-HANDLE | Buy now |
| Pipe cutter | T-CUTTER | Buy now |
The joy of building a DIY hammock stand from scratch
Now, let’s talk about the building process itself. With tinktube’s building system at your fingertips, you’ll feel like a modern-day Michelangelo – except instead of marble, you’ll be sculpting with steel pipes and connectors. And with nuts and bolts, you can galvanize your creations into a sturdy, freestanding structure.
The best part? You don’t need a fancy workshop or a degree in engineering to make a DIY hammock stand. Our guide is designed with DIYers of all skill levels in mind, so whether you’re a seasoned pro or a total newbie, you’ll be swinging in your hammock in no time.
DIY hammock stand plans: Step-by-step instructions
Now, onto the fun part – building your DIY hammock stand! Follow the instructions below to ensure smooth sailing from start to finish. Think of it as your very own DIY roadmap, guiding you every step of the way as you transform raw materials into a backyard masterpiece. You’ll see, it’ll be easy to build!
Step 1: Prepare your workspace
Find a flat, open area in your backyard where you can work comfortably, ensuring enough space to assemble the uprights for your free-standing hammock stand. Lay out all your materials and tools so everything is within easy reach.
Step 2: Cut your pipes to size
Using a tube cutter, carefully cut your steel pipes to the right lengths. Remember to measure twice and cut once to ensure accuracy.
| Qty. | Length (inch) | Length (centimeter) |
|---|---|---|
| 2 | 88″ | 223,52 cm |
| 2 | 70″ | 177,8 cm |
| 2 | 48″ | 121,92 cm |
| 2 | 13 5/16″ | 33,81 cm |
| 4 | 12 3/4″ | 32,39 cm |
Step 3: Assemble the hammock frame


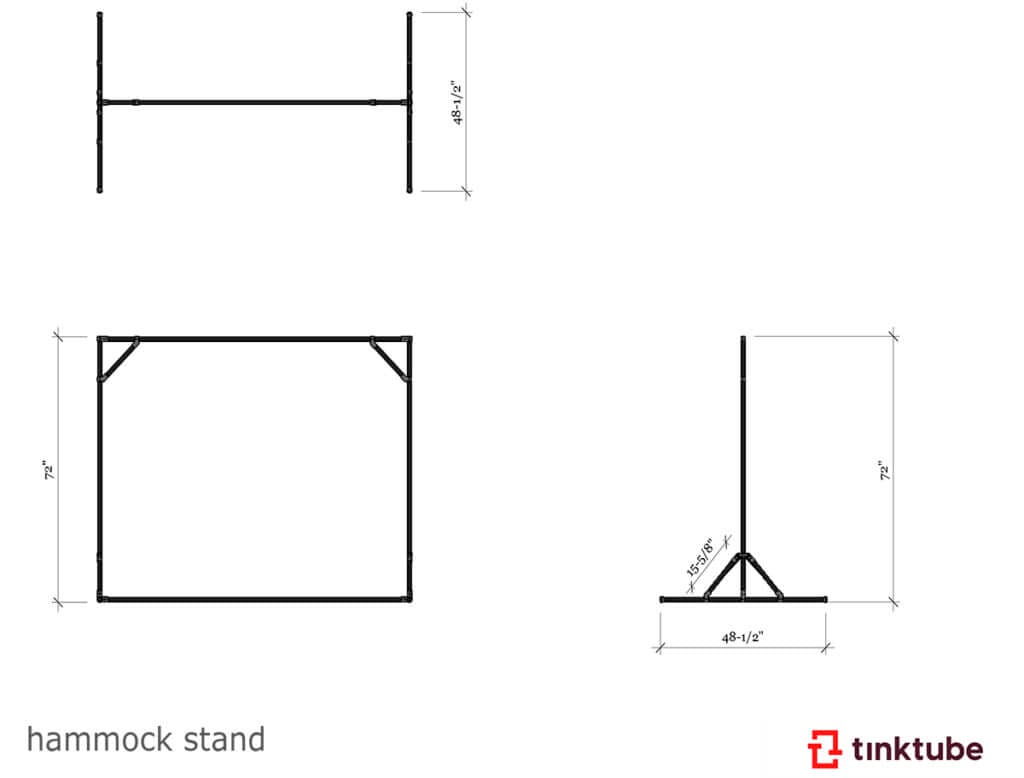
Begin by connecting the base pieces of your hammock stand using tinktube connectors. Then, gradually build upwards, following the diagram above.
Step 4: Attach hammock hooks
Once the frame is assembled, it’s time to attach the hooks. Make sure they’re securely fastened to support your weight without any wobbling or instability. Then, you’re ready to hang the hammock!
As for any DIY project, remember that everything is customizable. You may want to build a hammock chair that’s fixed to a pergola (a project that you could also build with tinktube), build a rocking hammock stand, or change the dimensions or the structure of this plan: the choice is yours! Just remember to adapt the number of pipes, the fittings and the cut list according to your own design.
Adding your personal touch
Once your DIY hammock stand is assembled, it’s time to put your personal stamp on it. Get creative with paint or stain to match your outdoor decor, or add some extra flair with decorative accents like twinkle lights or hanging plants.
The sky’s the limit when it comes to customizing your creation, so let your imagination run wild!
Get started on your outdoor project today: Build this DIY hammock stand!
We bet you’re already dreaming of hanging your hammock and basking in the glory of your DIY handiwork. So, what are you waiting for?
Head on over to our online shop and get ready to embark on the DIY adventure of a lifetime. Whether you’re a DIY veteran or a first-time builder, we’ve got everything you need to turn your backyard dreams into reality. Happy hammock-ing!
Arbor made by Ian
Ian built an arbor for his frontyard path.


