If your plants find themselves seeking solace from the scorching sun, then you’re in the right place. We’ve got a shady proposition for you – why not embark on a delightful DIY adventure and create your very own garden shade? And the best part? We’ve got a free plan for you to follow! In this article, we’ll guide you through the process of building your own garden shade using the tinktube building system. Not only will you get to flex your DIY muscles, but you’ll also be able to enjoy the fruits (or rather, the shade) of your labor in no time! Now, let’s dive into the four steps of our free plan, shall we?
- First, we’ll discuss the parts you’ll need to gather. From connectors to pipes, we’ll ensure you have everything required to bring your garden shade to life.
- Once you’ve got your hands on all the necessary materials, it’s time to tackle the cut list. Fear not, measuring and cutting will be a breeze! We’ll provide detailed instructions to help you slice through those steel pipes like a pro.
- Next, we’ll guide you through the assembling part of the process. With tinktube’s clever design, putting the puzzle pieces together will be as fun as completing a jigsaw. Just follow our step-by-step instructions, and you’ll be marveling at your handiwork in no time.
- And finally… Picture your plants growing rapidly under the soothing shade of your newly built garden tropical retreat. Whether you’re growing vegetables, climbing plants or flowers, this is the moment you’ve been waiting for. We’ll wrap up our free plan by sharing tips on how to truly relish your project and bask in the glory of your beautiful garden!
So, grab your hard hat, roll up your sleeves, and get ready to embark on an adventure in the world of DIY garden shades. With this free plan and tinktube’s building system by your side, you’ll be shading in style before you know it. Let’s turn up the fun and get building!
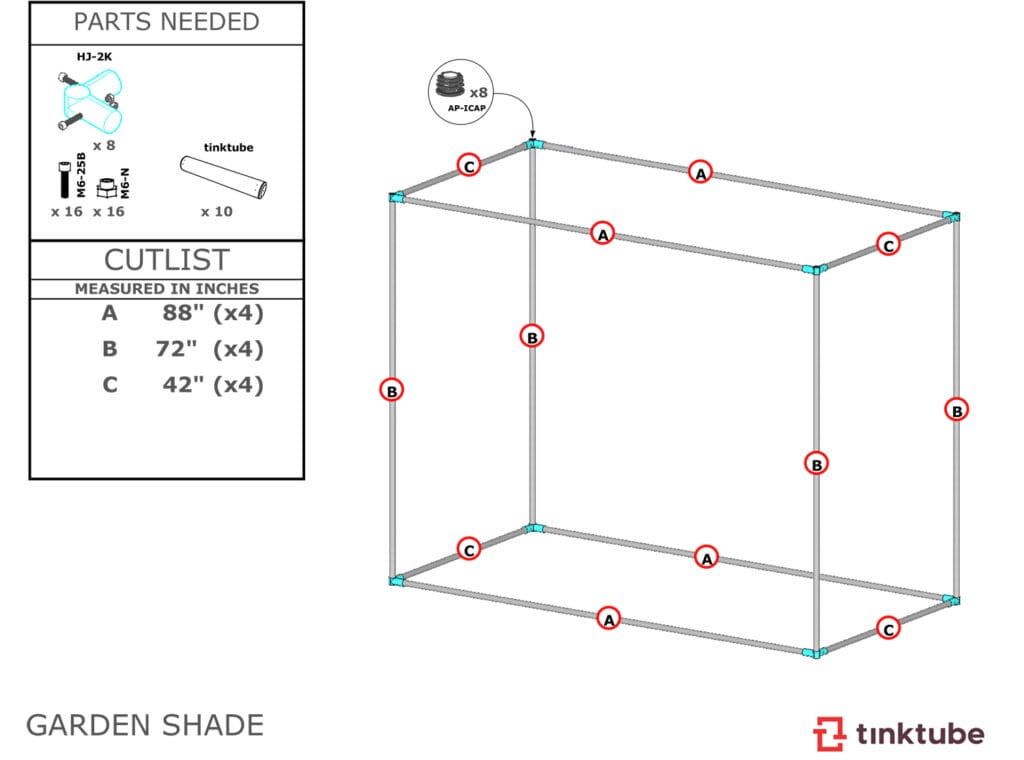
1. The parts you’ll need to build your garden shade
To kick off your DIY garden shade project, let’s start with gathering the parts. The table below provides a list of all the essential components you’ll need to construct your shady oasis. And before ordering the parts, make sure to adapt the plans according to your own version of the project. Will the garden shade be the exact same size as this one, or will you need something a little longer? Once you’ve modified the original plans, you can go over this list and validate which parts you’ll actually need and the ones you won’t. You can use the measurements presented in section 3 for reference and change the parts according to your own design!
| Qty. | Part | SKU | Link |
|---|---|---|---|
| 10 | 1-1/16" x 92" Galvanized steel pipe | PT-92-GV | Buy now |
| 8 | 90 Degree Corner Pipe Connector | HJ-2K | Buy now |
| 8 | Plastic Pipe End Cap | AP-ICAP | Buy now |
Once you’ve gathered all the parts, you’re well on your way to bringing your garden shade to life. With the right components in hand, you’re now ready to move on to the next step of our free plan: creating the cut list.
Don’t Forget the Extras:
Think about any additional components that might enhance your garden shade’s functionality and aesthetic appeal. This could include items like fabric covers, netting, or even decorative elements to add a personal touch. Consider the purpose of your shade structure and choose extras that align with your needs and style.
2. The cut list
Now that you’ve gathered all the necessary materials for your garden shade project, it’s time to dive into the next exciting step: creating a cut list. Don’t worry if you’re not a seasoned carpenter or a professional with power tools. With our detailed instructions, measuring and cutting those steel pipes will be a breeze! To make your life easier, use the cut list below to recreate the project. If you’ve chosen to customize the dimensions of your project, adjust the cut list according to your own DIY adventure.
| Qty. | Length (inch) | Length (centimeter) |
|---|---|---|
| 4 | 88″ | 223.52 cm |
| 4 | 72″ | 182.88 cm |
| 4 | 42″ | 106.68 cm |
The tools you’ll need:
Before you start slicing and dicing, make sure you have the right tools for the job. For cutting steel pipes, a pipe cutter will work wonders (if you don’t already have one, get it from our shop here. You’ll need it to cut the pipes, and you’ll be able to use it again on your next tinktube projects). The tinktube joint sets are assembled with bolts that require the following tools:
| Tool name | Number | Link |
|---|---|---|
| Hex drill bit set (x5) | T-BIT | Buy now |
| T handle wrench | T-HANDLE | Buy now |
Remember, precision is key when creating your cut list. Measure twice, cut once! With your accurately cut steel pipes in hand, you’re now ready to move on to the assembling part of our free plan.
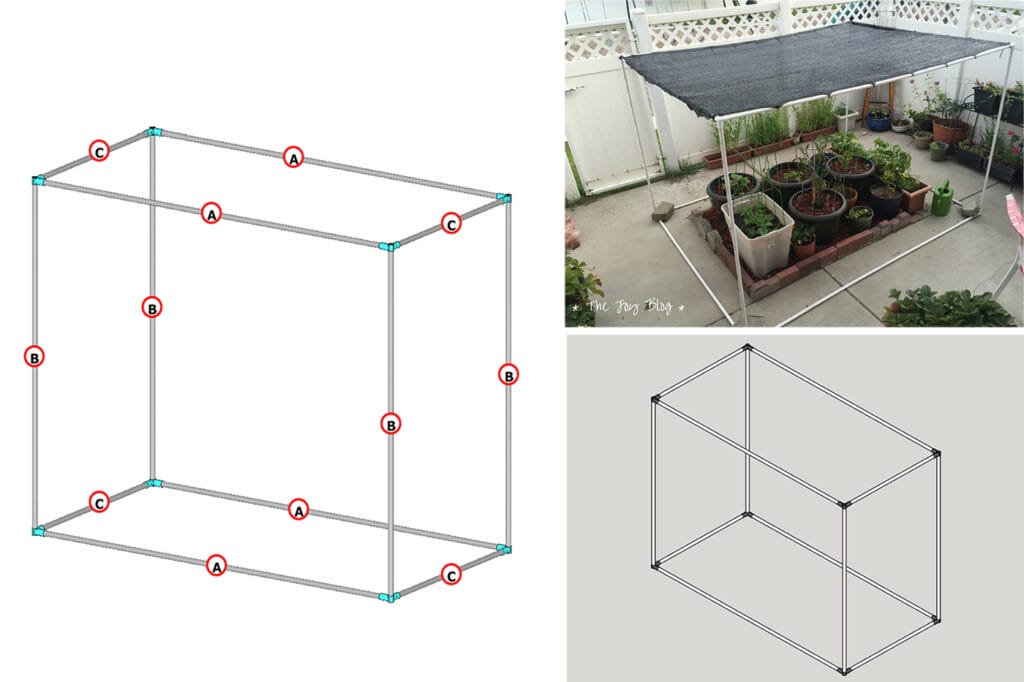
3. Build your DIY garden shade
Now that all the pipes are cut and you’ve gathered all the connectors, you’re ready to start building your garden shade project. Use the colour codes to place all the right connectors with the tubes in the right places.
- Lay out your components: Before you start assembling, take a moment to lay out all your tinktube parts. Familiarize yourself with the different types of connectors and pipes you have. This will help you visualize the structure and ensure you have everything you need before diving into the assembly process!
- Start with the base: The base of your garden shade provides stability and support. Begin by connecting the appropriate connectors and pipes to form the foundation. Follow your plan to determine the size and shape of the base. Ensure that the connections are secure and tightly fitted. This will serve as the anchor for the rest of the structure.
- Build upwards: Once the base is in place, it’s time to build upwards. Connect the vertical pipes to the base using the designated connectors. You may need corner connectors or tee connectors, depending on your design. As you add each pipe, make sure they are level and plumb. Double-check the connections to ensure they are secure and stable.
Double-check and adjust:
After completing the initial assembly, take a step back and inspect your garden shade’s framework. Check for any wobbling or unstable connections. Make any necessary adjustments to ensure a sturdy structure. It’s better to catch and fix any issues now than later!
Add finishing touches:
With the main structure in place, it’s time to add any finishing touches, like attaching a fabric cover or netting for shade and protection. Get creative and make your garden shade uniquely yours!
4. Cultivating a green future: empowering plant growth
You’re done building your DIY garden shade and you can now start growing veggies, fruits and plants! To discover more inspirations for DIY garden projects, take a look at these garden shade ideas! We hope you’ve enjoyed this content and had a blast building with tinktube! Send us pictures of your project at [email protected] and we’ll give you a 10% promo code for your next order.

Arbor made by Ian
Ian built an arbor for his frontyard path.

Metal or Wood: The Ultimate Showdown of Materials for DIY Railings

DIY Portable Duck Blinds: Quacking Your Way to Hunting

DIY Gate Plans: Fence Gate for Gardens and Backyards

Cover frame by Thomas
