Closets are like the black holes of our homes – they have the magical ability to swallow up our belongings and leave chaos in their wake. But amidst the clutter lies the promise of transformation… Enter the world of tinktube DIY projects, where creativity reigns supreme. Here, we believe that every closet has the potential to be an example of organization and style, waiting to be unveiled with a dash of ingenuity. We invite you to embark on a journey to reclaim our closets with our DIY closet organizer plans. With tinktube’s building system, you can whip that chaotic closet into shape in no time!
Benefits of creating a DIY closet organizer
Picture this: a closet where everything has its place, where you can find your favorite sweater or pair of shoes without having to excavate through mountains of clutter. That’s the beauty of a DIY closet organizer – it brings order to the chaos and makes your life just a little bit easier.
- Maximized space utilization: By customizing your closet organizer to fit your specific storage needs, you can make the most of every inch of space, even in small or awkwardly shaped closets.
- Improved visibility: No more forgetting about that blouse buried at the back of the closet or losing track of your favorite belt. A DIY closet organizer ensures that everything is visible and easily accessible.
- Enhanced clothing care: Properly organizing your clothes and accessories can help extend their lifespan by reducing wrinkles, preventing creases, and minimizing the risk of damage from being crammed into tight spaces.
- Cost-effectiveness: DIY closet organizers are often more affordable than pre-made storage solutions, allowing you to achieve a high level of organization without breaking the bank.
- Personalized design: Say goodbye to cookie-cutter closet layouts. With a DIY approach, you have the freedom to design a closet organizer that perfectly suits your style, preferences, and storage requirements.
Tools and materials needed to build your DIY custom closet system
Before diving headfirst into the world of closet organization systems, ensure you’re equipped with the essential tools and materials to tackle this project with finesse. Working with tinktube has many benefits. Among those, you’ll avoid woodworking, which also means working with specific saws and chemicals like wood glue or wood stains.
On the opposite, building with tinktube means you’ll need a minimal amount of tools, no workshop, and a rather user-friendly material! So check out the lists below and get ready to turn your closet into a haven of tidiness and style.
Your list of materials
| Qty. | Part | SKU | Link |
|---|---|---|---|
| 19 | 1-1/16" x 92" Jet black steel pipe | PT-92-BK | Buy now |
| 14 | Plastic Pipe End Cap | AP-ICAP | Buy now |
| 38 | 90 Degree Corner Pipe Connector | HJ-2K | Buy now |
| 5 | Modular & Structural T Connector | HJ-1 | Buy now |
| 5 | 4 Way Structural Pipe Connector Joint | HJ-3 | Buy now |
| 7 | Intersection black connector set | HJ-7 | Buy now |
The tools you’ll need
| Tool name | Number | Add To Cart |
|---|---|---|
| T handle wrench | T-HANDLE | Buy now |
| Pipe cutter | T-CUTTER | Buy now |
Step-by-step plan to building DIY closet shelves for your walk-in
1. Order your tinktube materials and tools online
You’ll find all the materials and tools you need on our website – except for the surfaces, which you’ll easily find at your local hardware store or online. Refer to the list below to identify what you need to buy for your project. Please note that if you modify the dimensions of the plans below to adapt the project to your space, you may need more or less tubes and different fittings.
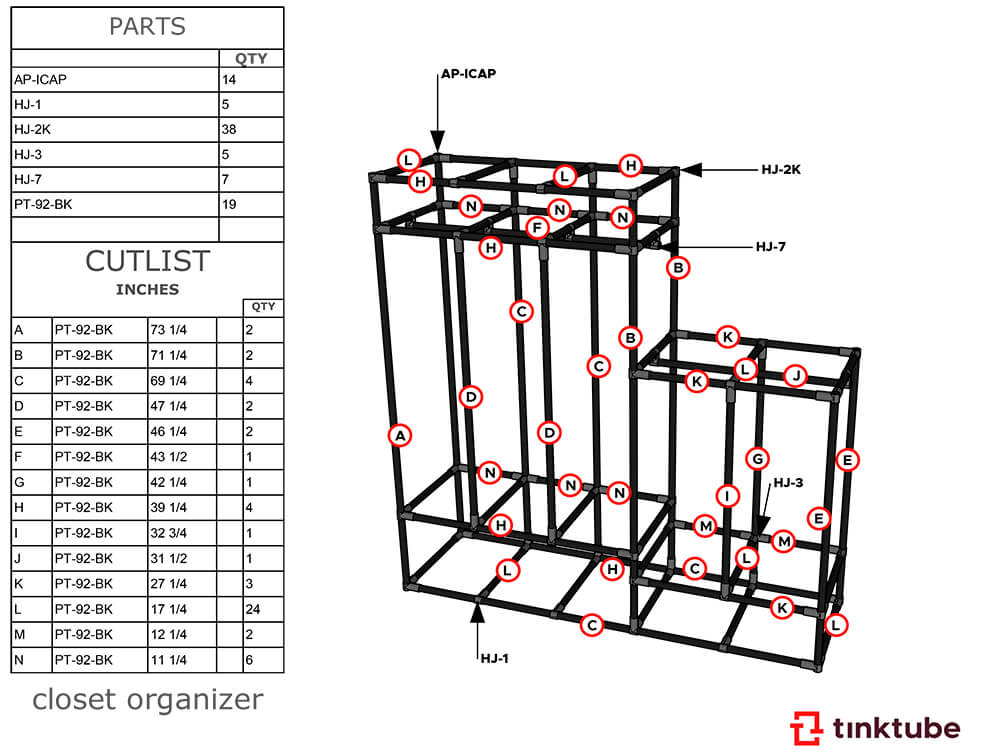
2. Measure twice, cut once: use this cut list as a reference
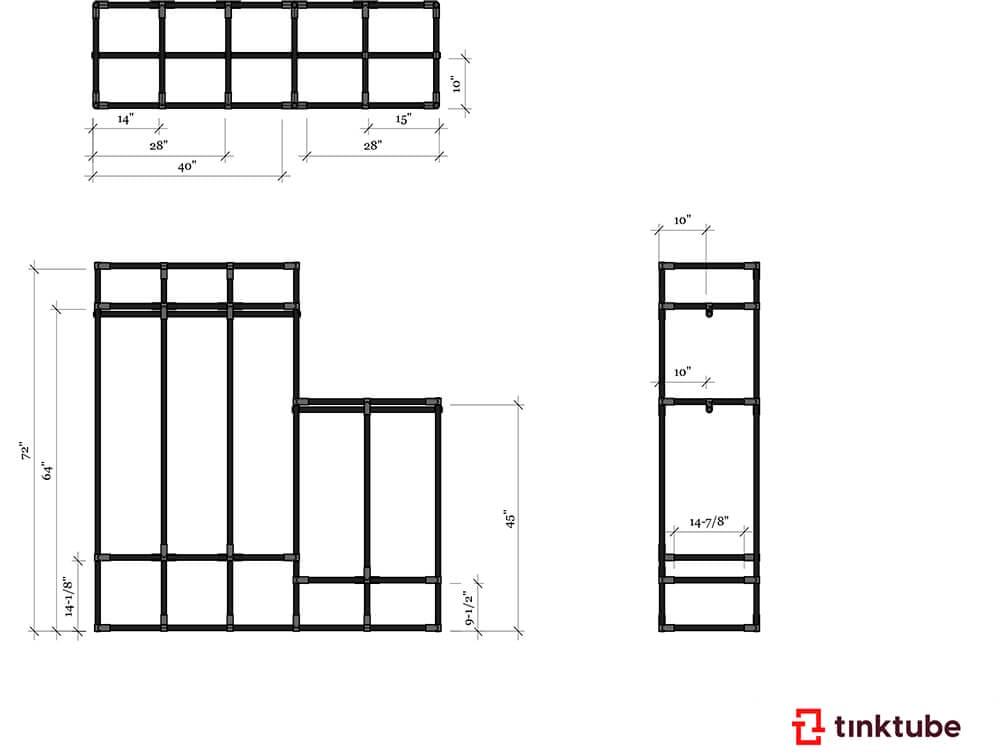
Measure the dimensions of your closet space and cut your steel pipes to size accordingly. Refer to the list below if our plan fits your closet perfectly, or use it as a starting point and modify it according to your own space.
| Qty. | Length (inch) | Length (centimeter) |
|---|---|---|
| 2 | 73 1/4″ | 186,1 cm |
| 2 | 71 1/4″ | 180,9 cm |
| 4 | 69 1/4″ | 175,9 cm |
| 2 | 47 1/4″ | 120 cm |
| 2 | 46 1/4″ | 117,5 cm |
| 1 | 43 1/2″ | 110,5 cm |
| 1 | 42 1/4″ | 107,3 cm |
| 4 | 39 1/4″ | 99,7 cm |
| 1 | 32 3/4″ | 83,2 cm |
| 1 | 31 1/2″ | 80 cm |
| 3 | 27 1/4″ | 69,2 cm |
| 24 | 17 1/4″ | 43,8 cm |
| 2 | 12 1/4″ | 31,1 cm |
| 6 | 11 1/4″ | 28,6 cm |
3. Assemble the frame from bottom to top shelf
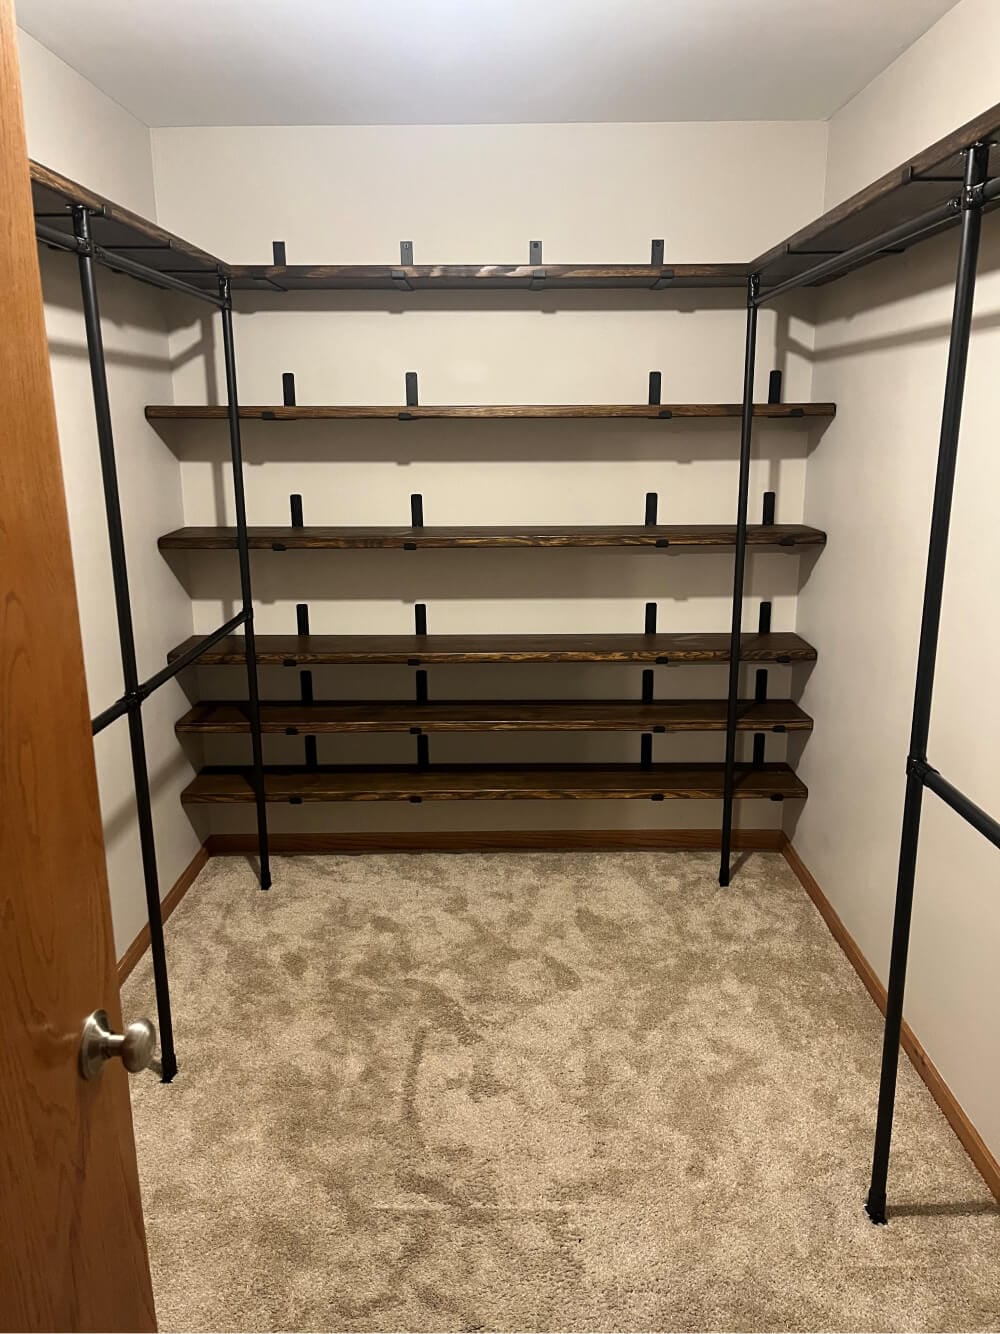
Using the pipes, connectors, and a T-handle wrench, assemble the frame of your walk-in closet organizer according to your measurements. Make sure everything is level and sturdy before moving on to the next step.
4. Optimize your closet organizer with personalized tweaks
Once the frame is in place, it’s time to get creative with accessories like hooks, baskets, and dividers to maximize storage potential and keep everything neat and tidy.
You can also add shelves and hanging closet rods.
Customize the layout to suit your storage needs – whether you need more space for shoes, cubbies for folded clothes, or hanging garments!
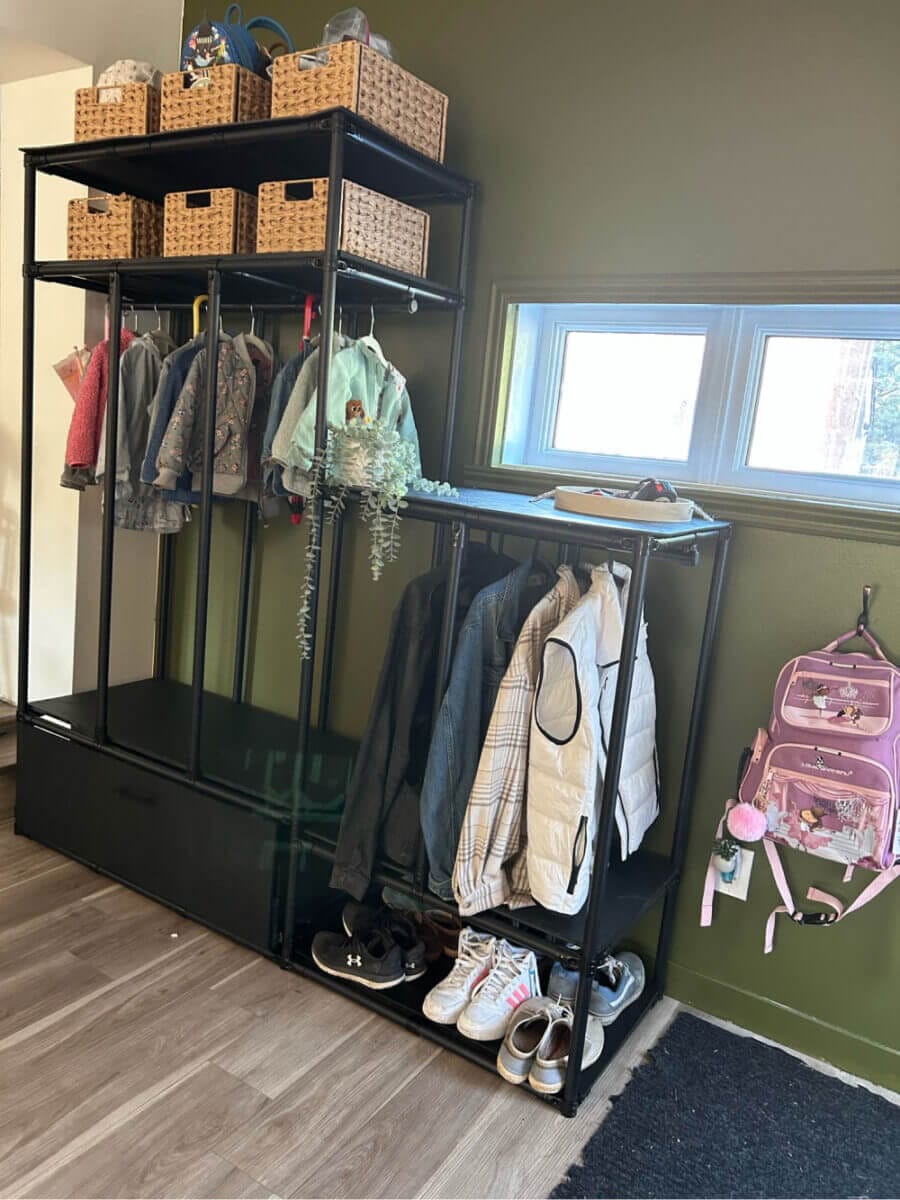
The project on your right is Xavier’s. He was looking for a storage solution in his entryway to keep his adorable daughters’ shoes from mysteriously scattering throughout the house.
So, he decided to take on the ultimate challenge: creating a super piece of furniture to store everything.
His biggest challenge: calculating the perfect height for the window without any overflow. He managed to align the furniture perfectly with the wall’s features!
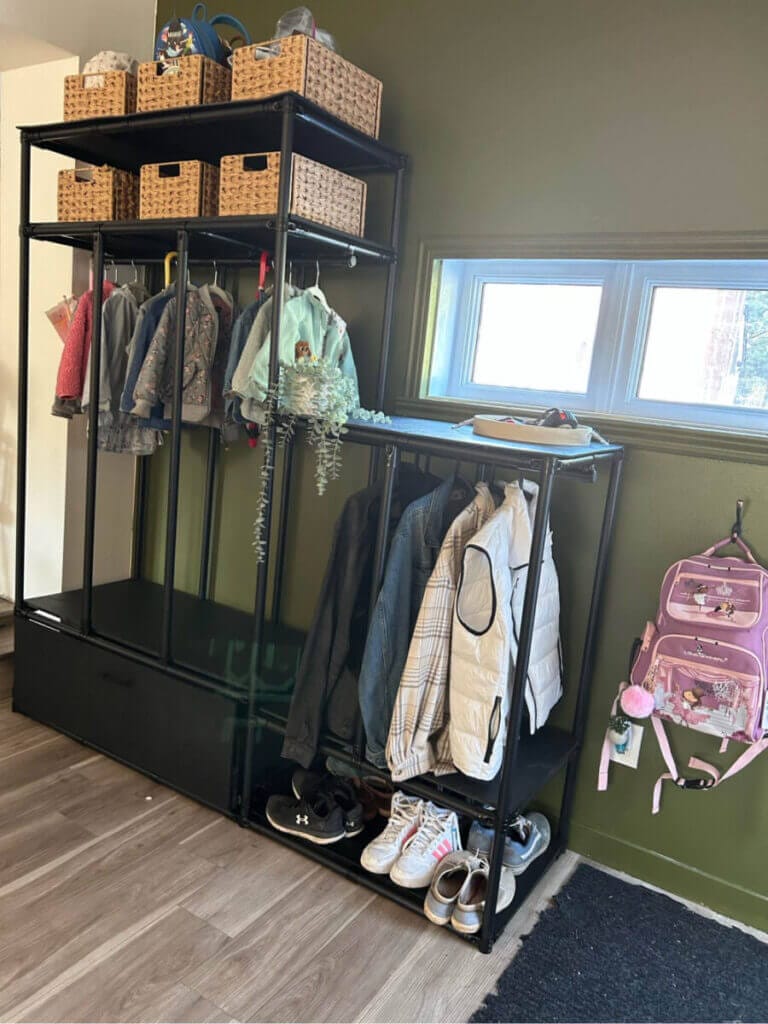
Ikea hack for big or small closet: maximizing storage with a custom master closet solution
And there you have it, folks – a foolproof guide to creating your very own DIY closet organizer using tinktube’s building system. Say goodbye to clutter and hello to a closet that’s as organized as it is stylish.
Whether you’re aiming to streamline your morning routine, make better use of your closet space, or simply enjoy the satisfaction of a well-organized wardrobe, your DIY closet organizer offers a multitude of benefits that are sure to enhance your daily life. Roll up your sleeves, grab your tools, and let’s get building!
