In the pursuit of an organized and clutter-free living space, the allure of crafting your own furniture goes beyond mere DIY satisfaction; it promises a tangible improvement in your day-to-day life. Imagine stepping into a home where the first thing you encounter is not chaos but a sleek and organized shoe rack, uniquely tailored to your needs. That’s precisely what our guide is all about – building a customizable DIY shoe rack with tinktube that brings a sense of accomplishment into your life and offers a direct enhancement to your daily routine.
So, what’s in it for you? This free plan presents an easy-to-follow path to a stylish and practical storage solution for your footwear. No advanced skills are needed; just a desire for an orderly home. Bid farewell to the frustration of searching for matching shoes or dealing with a cluttered entryway. Instead, usher in an aesthetically pleasing and functional addition to your home decor that reflects your personal style.
Join us on this journey as we explore the art of DIY, blending style with simplicity to create a space-saving storage solution that caters to the unique needs of your home – all while embracing the satisfaction of a hands-on approach to organization!
1. The parts and tools you’ll need to build your DIY shoe rack

This first step of our free guide is where we walk you through the essential components required for this project. Our goal is to make sure you can buy everything you need online before you start, so you can optimize your creation process and have fun with your home organization DIY!
The exact number and length of the tubes will depend on the dimensions of your own space-saving shoe rack. Feel free to adjust the list as necessary!
Just remember, if you change the dimensions, you will also have to adjust the number of pipes you buy to ensure you have enough tubes to create your project. We recommend having a few extra on hand for any unexpected changes or adjustments during assembly!
| Qty. | Part | SKU | Link |
|---|---|---|---|
| 3 | 1-1/16" x 92" Jet black steel pipe | PT-92-BK | Buy now |
| 4 | Plastic Pipe End Cap | AP-ICAP | Buy now |
| 4 | Flat Offset Pipe Clamp Black Set | HJ-15 | Buy now |
| 2 | 90 Degree Corner Pipe Connector | HJ-2K | Buy now |
| 6 | Modular & Structural T Connector | HJ-1 | Buy now |
| 4 | Intersection black connector set | HJ-7 | Buy now |
| 8 | 90° Elbow Pipe Connector | HJ-90 | Buy now |
The tools you’ll need:
Before you start, make sure you have the right tools for the job. These are listed below:
| Tool name | Number | Link |
|---|---|---|
| T handle wrench | T-HANDLE | Buy now |
| Pipe cutter | T-CUTTER | Buy now |
Once you’ve gathered all the parts and tools, you’re well on your way to creating your DIY shoe rack project.
2. The cut list for your tinktube space-saving shoe rack
This step should be fun: with this very precise cut list, you’ve got everything you need to prepare your tubes for the build!
| Qty. | Length (inch) | Length (centimeter) |
|---|---|---|
| 2 | 32 3/16″ | 81.76 cm |
| 5 | 27 15/16″ | 70.96 cm |
| 2 | 7 15/16″ | 20.16 cm |
| 4 | 5 3/16″ | 13.18 cm |
| 2 | 5 1/16″ | 12.89 cm |
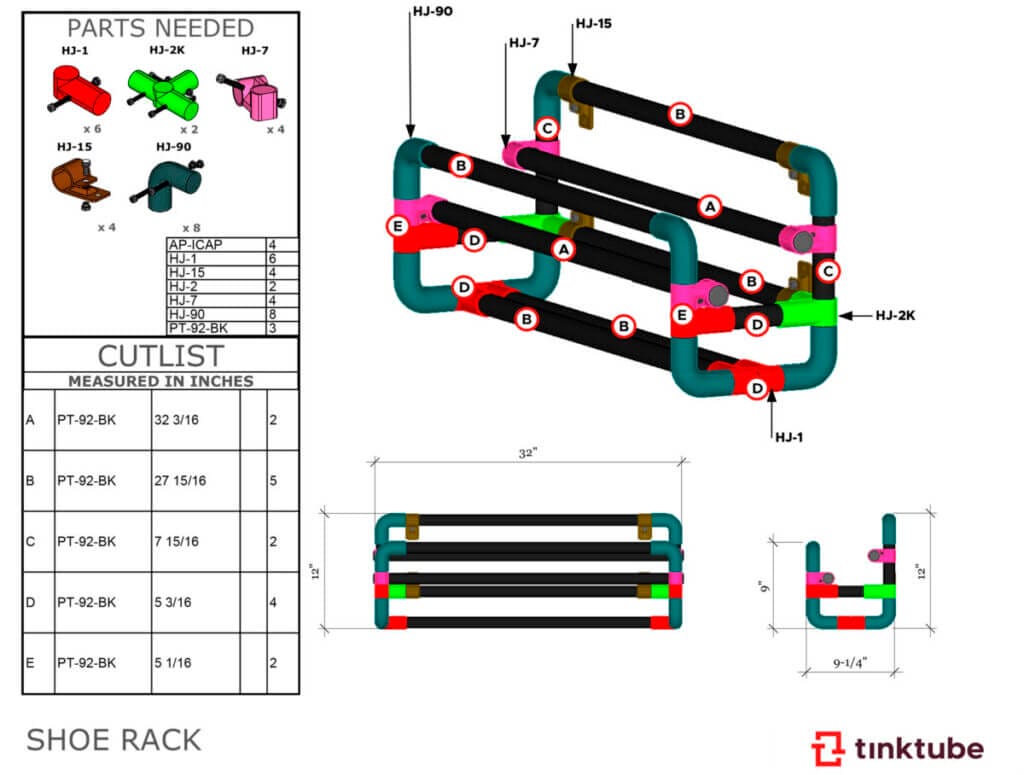
3. Use the plan below to build your project (the fun part)!
You know you’re ready to start building your beginner-friendly DIY rack when all the pipes are cut and you’ve gathered all the connectors in one place. Use the plan below to place all the right connectors with the tubes in the right places.
Organize your components before you start assembling and take a moment to familiarize yourself with the different types of connectors and pipes you have. This will help you visualize the whole structure and ensure you have everything you need before diving into the assembly process!

After completing the assembly, inspect your build. Check for any wobbling or unstable connections. Make any necessary adjustments to ensure a sturdy structure. It’s better to catch and fix any issues now than later!
Remember, this is a DIY project: feel free to make adjustments according to your specific dimensions and requirements. Building a DIY shoe rack should be a fun and customizable experience, so don’t be afraid to adapt the materials and quantities to your vision.
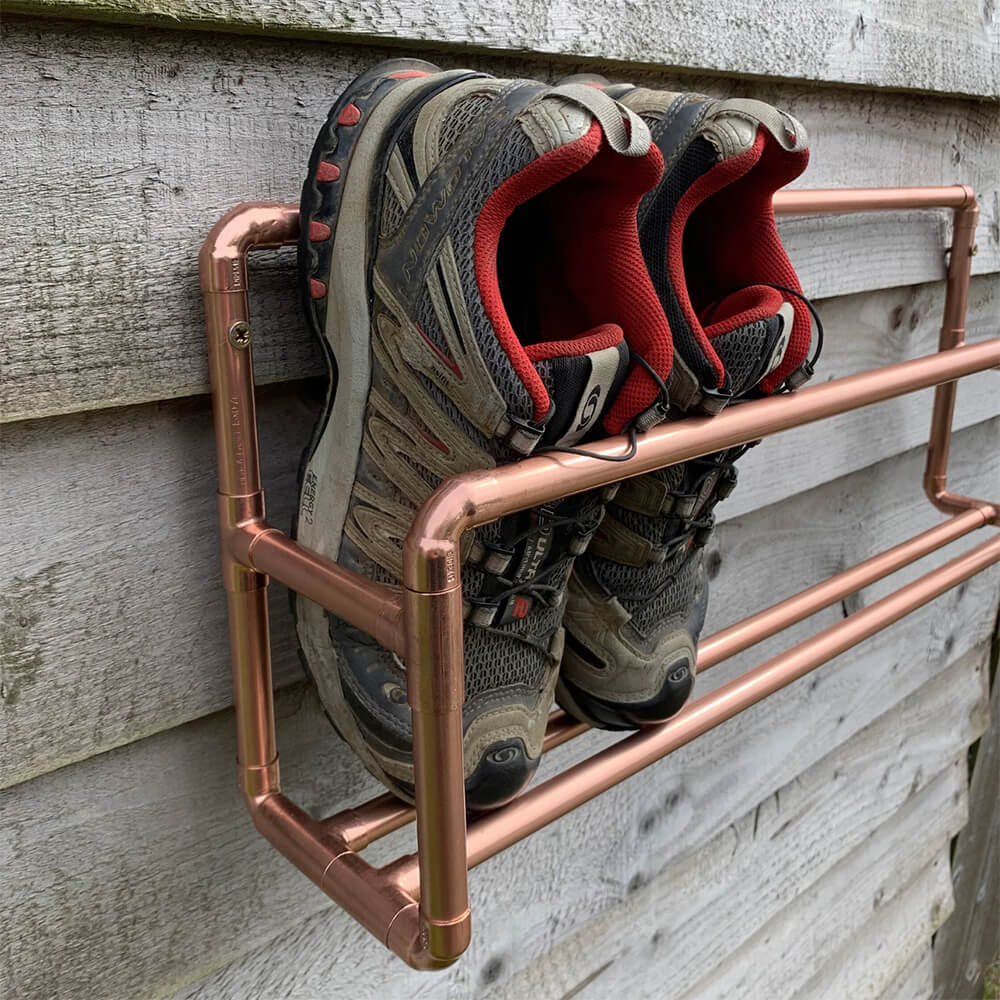
4. Stylish shoe rack designs for your home
We hope that you found immense satisfaction in the creation of this project and we encourage you to embark on your DIY journey with creativity and the awareness that the possibilities are endless. Your DIY efforts will add convenience to your environment, enhance your quality of life and help you create a daily life that’s more like you!
Psssst: if you’re feeling particularly proud of your garden bed greenhouse (as you should be!), please share it with us: we absolutely love seeing the incredible projects our community creates. Send us pictures at [email protected], and as a token of our appreciation, we’ll send you a 10% promo code for your next order. It’s a small way for us to say thank you for being a part of the tinktube family and for embracing the spirit of DIY!
Arbor made by Ian
Ian built an arbor for his frontyard path.


